Bathroom Cleaning Checklist: A Step-by-Step Guide
Introduction Bathroom Cleaning Essentials
Okay, let's talk bathrooms. Not the most glamorous topic, but definitely a necessity. A clean bathroom isn't just about appearances; it's about hygiene and creating a more pleasant living space. This guide is your go-to resource for tackling even the grimiest of bathrooms, step by step. We'll cover everything from the basics to those often-overlooked spots. Think of it as your bathroom cleaning bootcamp – but without the yelling (unless you're yelling at the mildew, which is totally understandable).
Gathering Your Bathroom Cleaning Supplies Tools Products
Before you dive in headfirst, you'll need the right tools. This is like preparing for battle, but with less armor and more rubber gloves. Here's a checklist:
- Cleaning Products: We'll get into specific recommendations later, but you'll need a bathroom cleaner (spray or liquid), toilet bowl cleaner, glass cleaner, and maybe a grout cleaner if you're feeling ambitious.
- Sponges and Scrub Brushes: Opt for non-scratch sponges to avoid damaging surfaces. A stiff-bristled brush is great for grout and tough stains. An old toothbrush is fantastic for those hard-to-reach spots around faucets and drains.
- Microfiber Cloths: These are your best friends for wiping down surfaces and leaving a streak-free shine.
- Rubber Gloves: Protect your hands from harsh chemicals and, let's be honest, gross stuff.
- Toilet Brush: Self-explanatory.
- Spray Bottle: Useful for diluting cleaning solutions or creating your own.
- Squeegee: A shower squeegee is a game-changer for preventing water spots and mildew.
- Trash Bags: For disposing of cleaning supplies and any accumulated bathroom debris.
- Optional but Helpful: A magic eraser, a scraper (for stuck-on soap scum), and a ventilation fan or open window (for proper ventilation).
Step 1 Bathroom Preparations Decluttering Ventilation
Before you start spraying and scrubbing, take a few minutes to prep the bathroom. This will make the whole process much smoother.
- Declutter: Remove all items from the counters, shelves, and shower. This includes toiletries, makeup, towels, and anything else that's cluttering the space. Put them in a basket or another room to keep them out of the way.
- Ventilate: Open a window or turn on the ventilation fan. Proper ventilation is crucial for preventing the buildup of harmful fumes from cleaning products.
- Rinse the Shower/Tub: Give the shower or tub a quick rinse with warm water. This will help loosen any loose dirt and grime.
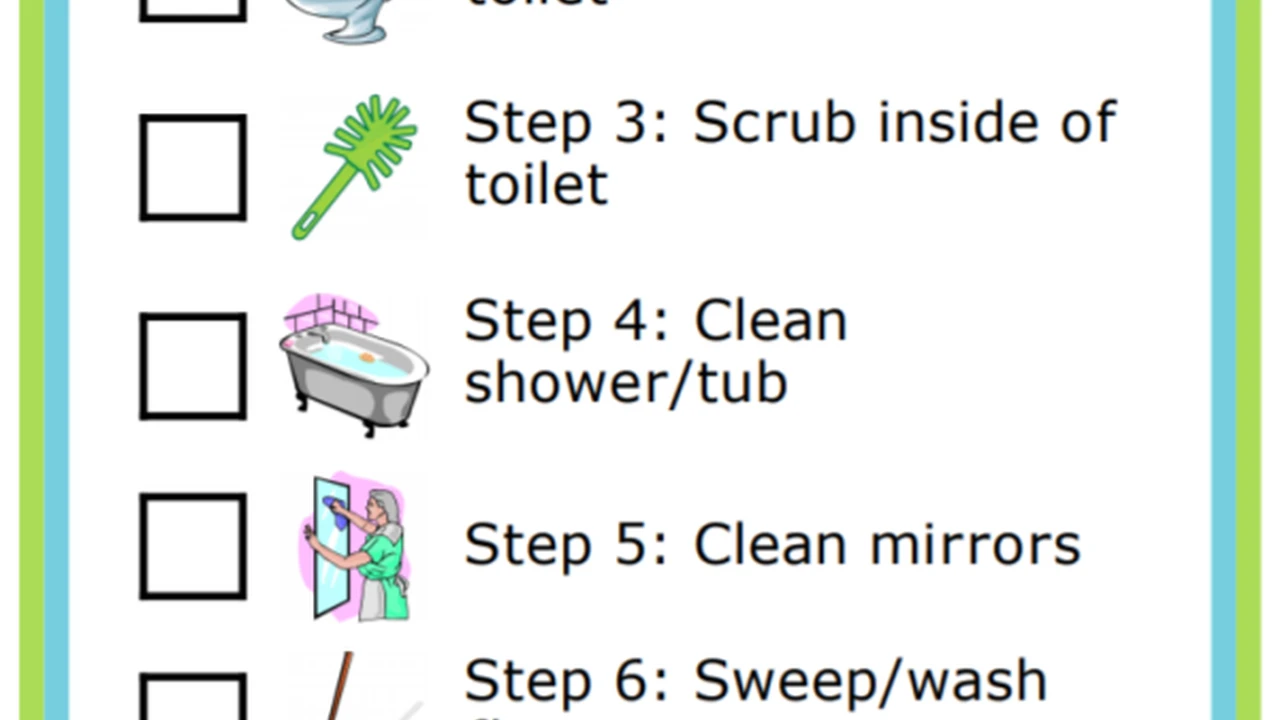
Step 2 Cleaning the Toilet Inside Out Best Practices
Let's face it, the toilet is probably the least favorite part of bathroom cleaning. But it's also one of the most important. Here's how to tackle it:
- Apply Toilet Bowl Cleaner: Squirt toilet bowl cleaner under the rim of the toilet bowl and let it sit for at least 10 minutes. This will help disinfect and loosen any stains.
- Clean the Exterior: While the cleaner is working its magic in the bowl, spray the exterior of the toilet with a bathroom cleaner. Wipe down the tank, lid, seat, and base with a microfiber cloth. Don't forget to clean behind the toilet!
- Scrub the Bowl: After the cleaner has had time to sit, use a toilet brush to scrub the inside of the bowl. Pay attention to any stains or buildup.
- Flush: Flush the toilet to rinse away the cleaner and debris.
- Final Wipe Down: Give the entire toilet a final wipe down with a clean microfiber cloth to remove any remaining cleaner or residue.
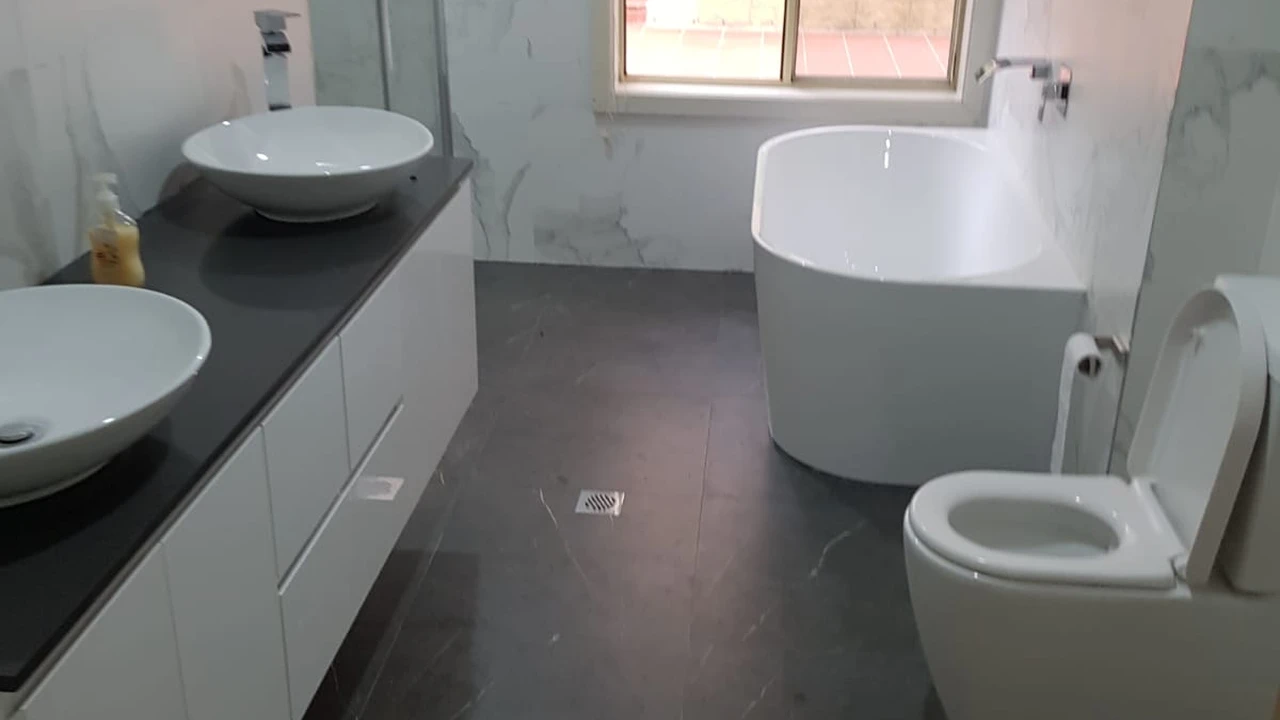
Step 3 Shower and Tub Cleaning Soap Scum Mildew Removal
The shower and tub can be breeding grounds for soap scum, mildew, and other unpleasantness. Here's how to get them sparkling clean:
- Spray with Bathroom Cleaner: Spray the shower walls, tub, and shower door/curtain with a bathroom cleaner. Let it sit for a few minutes to loosen the grime.
- Scrub: Use a sponge or scrub brush to scrub the surfaces. Pay attention to areas with soap scum or mildew. For tough stains, you may need to use a grout cleaner or a magic eraser.
- Rinse: Rinse thoroughly with warm water.
- Squeegee: Use a shower squeegee to remove excess water from the shower walls and door. This will help prevent water spots and mildew.
- Clean Showerhead: Over time, showerheads can accumulate mineral deposits. To clean them, fill a plastic bag with vinegar and secure it around the showerhead with a rubber band. Let it soak for a few hours or overnight. Then, remove the bag and run the shower to flush out the vinegar and any loosened deposits.
Step 4 Sink and Countertop Cleaning Disinfecting Shining
The sink and countertops are high-traffic areas that need regular cleaning. Here's how to keep them looking their best:
- Clear the Area: Remove any items from the sink and countertops.
- Spray with Bathroom Cleaner: Spray the sink, countertops, and faucet with a bathroom cleaner.
- Wipe Down: Wipe down the surfaces with a microfiber cloth. Pay attention to any areas with toothpaste splatters or other messes.
- Clean the Faucet: Use an old toothbrush to clean around the base of the faucet and in any hard-to-reach areas.
- Rinse: Rinse thoroughly with warm water.
- Dry and Shine: Dry the surfaces with a clean microfiber cloth to prevent water spots and leave a streak-free shine.
Step 5 Mirror and Glass Cleaning Streak Free Results
Streaky mirrors and glass can make a bathroom look dingy. Here's how to get them sparkling clean:
- Spray with Glass Cleaner: Spray the mirror and any glass surfaces with a glass cleaner.
- Wipe Down: Wipe down the surfaces with a clean microfiber cloth. Use a vertical motion for the first pass and a horizontal motion for the second pass. This will help prevent streaks.
- Dry and Shine: Dry the surfaces with a clean, dry microfiber cloth to remove any remaining streaks.
Step 6 Floor Cleaning Sweeping Mopping Disinfecting
Don't forget the floor! It's important to keep the bathroom floor clean to prevent the spread of germs and bacteria.
- Sweep or Vacuum: Sweep or vacuum the floor to remove any loose dirt, dust, and debris.
- Mop: Mop the floor with a bathroom cleaner or a diluted bleach solution. Be sure to read the instructions on the cleaner before using it.
- Dry: Allow the floor to air dry or dry it with a clean towel.
Recommended Bathroom Cleaning Products Reviews Prices Comparisons
Choosing the right cleaning products can make a big difference in how effective your cleaning efforts are. Here are a few recommendations, along with price comparisons and usage scenarios:
- Lysol Disinfectant Bathroom Cleaner: This is a classic for a reason. It effectively kills germs and bacteria, cuts through soap scum, and leaves a fresh scent. Price: Around $4-$6 per bottle. Usage: Spray on surfaces, let sit for a few minutes, then wipe clean. Great for general bathroom cleaning.
- Pros: Widely available, effective disinfectant, affordable.
- Cons: Strong scent, can be harsh on some surfaces.
- Alternatives: Clorox Disinfectant Bathroom Cleaner (similar effectiveness, different scent), Seventh Generation Disinfecting Bathroom Cleaner (plant-based, milder scent).
- Scrubbing Bubbles Bathroom Grime Fighter Aerosol: This aerosol spray is great for getting into hard-to-reach areas and tackling tough grime. Price: Around $5-$7 per can. Usage: Spray on surfaces, let the foam work for a few minutes, then wipe clean. Ideal for showers and tubs.
- Pros: Easy to use, effective on grime, reaches tight spaces.
- Cons: Aerosol can be irritating to some, strong scent.
- Alternatives: Method Bathroom Cleaner (plant-based, gentle formula), Kaboom Shower, Tub & Tile Cleaner (specifically designed for soap scum and mildew).
- CLR Calcium, Lime & Rust Remover: For stubborn mineral deposits and rust stains, CLR is a powerful solution. Price: Around $6-$8 per bottle. Usage: Apply directly to the stain, let sit for a few minutes, then scrub and rinse. Use with caution on delicate surfaces.
- Pros: Highly effective on mineral deposits and rust.
- Cons: Strong chemicals, requires careful use, can damage some surfaces.
- Alternatives: Vinegar (a natural alternative, but less powerful), Bar Keepers Friend (a powdered cleaner that can be used on various surfaces).
- The Pink Stuff Cleaning Paste: This all-purpose cleaning paste is a cult favorite for removing tough stains and grime from various surfaces, including bathroom fixtures. Price: Around $5-$7 per tub. Usage: Apply with a damp cloth or sponge, scrub gently, and rinse.
- Pros: Effective on a wide range of stains, versatile, pleasant scent.
- Cons: Can be abrasive on delicate surfaces, requires some scrubbing.
- Alternatives: Baking soda paste (a natural alternative), Bon Ami Powder Cleanser (a gentle abrasive cleaner).
- Windex Original Glass Cleaner: The gold standard for streak-free glass cleaning. Price: Around $3-$5 per bottle. Usage: Spray on glass surfaces and wipe clean with a microfiber cloth.
- Pros: Effective, widely available, affordable.
- Cons: Can have a strong ammonia smell.
- Alternatives: Sprayway Glass Cleaner (aerosol foam for easy application), Invisible Glass Premium Glass Cleaner (leaves a protective coating).
Product Comparison Table:
| Product | Price | Usage | Pros | Cons |
|---|---|---|---|---|
| Lysol Disinfectant Bathroom Cleaner | $4-$6 | Spray and wipe | Effective, affordable, widely available | Strong scent, harsh on some surfaces |
| Scrubbing Bubbles Bathroom Grime Fighter | $5-$7 | Spray and wipe (foam) | Easy to use, effective on grime | Aerosol, strong scent |
| CLR Calcium, Lime & Rust Remover | $6-$8 | Apply directly, scrub, rinse | Highly effective on mineral deposits | Strong chemicals, requires caution |
| The Pink Stuff Cleaning Paste | $5-$7 | Apply, scrub, rinse | Versatile, effective on stains | Can be abrasive |
| Windex Original Glass Cleaner | $3-$5 | Spray and wipe | Effective, affordable | Ammonia smell |
Bathroom Cleaning Frequency Establishing a Routine
How often should you clean your bathroom? It depends on how often it's used and how many people use it. Here's a general guideline:
- Daily: Wipe down the sink and countertops after each use. Squeegee the shower after each shower.
- Weekly: Clean the toilet, shower/tub, sink, and countertops. Mop the floor.
- Monthly: Deep clean the bathroom, including cleaning the grout, cleaning the showerhead, and decluttering.
Establishing a routine can make bathroom cleaning less of a chore. Set aside a specific time each week to clean the bathroom, and stick to it as much as possible. You can also break down the cleaning tasks into smaller, more manageable chunks. For example, you could clean the toilet one day, the shower another day, and the sink and countertops another day.
Bathroom Cleaning Tips and Tricks Hacks Shortcuts
Here are a few extra tips and tricks to make bathroom cleaning easier and more effective:
- Use Baking Soda and Vinegar: This dynamic duo is great for cleaning drains and removing stains. Pour baking soda down the drain, followed by vinegar. Let it fizz for a few minutes, then flush with hot water.
- Clean Grout with a Baking Soda Paste: Mix baking soda with water to form a paste. Apply the paste to the grout, let it sit for a few minutes, then scrub with a brush.
- Use Lemon Juice to Remove Hard Water Stains: Lemon juice is a natural acid that can help dissolve hard water stains. Apply lemon juice to the stain, let it sit for a few minutes, then wipe clean.
- Prevent Mildew with a Dehumidifier: A dehumidifier can help reduce moisture in the bathroom, which can prevent mildew growth.
- Keep Cleaning Supplies Handy: Keep your cleaning supplies in a convenient location so you can easily grab them when you need them.
Maintaining a Clean Bathroom Beyond Cleaning Prevention
Keeping your bathroom clean isn't just about scrubbing and spraying. It's also about preventative measures. Here are a few things you can do to maintain a clean bathroom between cleanings:
- Wipe up spills immediately.
- Hang up towels to dry.
- Empty the trash can regularly.
- Ventilate the bathroom after showering.
- Use a shower squeegee.
By following these tips, you can keep your bathroom clean and fresh with minimal effort.
:max_bytes(150000):strip_icc()/277019-baked-pork-chops-with-cream-of-mushroom-soup-DDMFS-beauty-4x3-BG-7505-5762b731cf30447d9cbbbbbf387beafa.jpg)